How-to: Set-up a site-to-site IPSec connection from a Ubiquiti EdgeRouter behind NAT to Cisco ASA
To connect business networks to each other a site-to-site IPSec is often employed. An IPSec connection is widely supported by corporate routing appliances like Cisco ASA, Sonicwall, Kerio and others. It happens Ubiquiti Edgerouters also support IPSec. In our case we needed to implement a site-to-site IPSec connection, with our Ubiquiti being inside a NAT network. This guide will show you how you can implement an IPSec site-to-site connection with your Edgerouter being NATted.
The case
For this guide we assume the layout shown below:
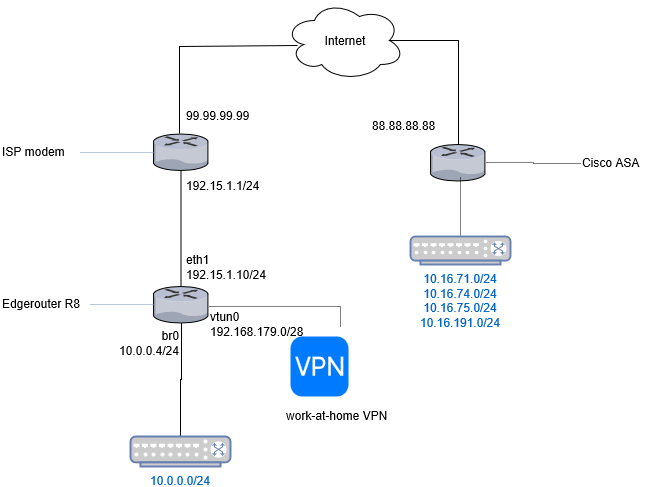
- The Edgerouter is NATted behind the ISP modem.
- The public IP address of the EdgeRouter and modem is 99.99.99.99.
- The internal NAT network between Edgerouter and the ISP modem is 192.15.1.0/24.
- The local LAN behind the EdgeRouter is 10.0.0.0/24.
- In addition, we allow collegues working at home to connect using OpenVPN. Those users are connected through the 192.168.179/28 subnet.
We need to set-up a classic IPSec connection to a Cisco ASA gateway at 88.88.88.88. We also like the VPN users of the 192.168.179/28 subnet to be able to the resources at 88.88.88.88.
The following information is agreed upon about the IPSec connection:
| Allowed remote subnets | 10.16.71.0/24 ; 10.16.74.0/24 ; 10.16.75.0/24 ; 10.16.191.0/24 |
| Allowed local subnets | 10.0.0.0/24 |
| Authentication | Pre-shared secret ABCDEF123 |
| ESP encryption and hash | AES256 / SHA1 |
| ESP lifetime | 3600 |
| IKE encryption and hash | AES256 / SHA1 |
| IKE lifetime | 86400 |
| Mode | Tunnel |
Set-up some definitions
In Edgerouter you can define networks and address ranges as groups, so you do not have to redefine them everywhere. Let’s do that first.
Define the remote tunnels:
set firewall group network-group cisco-asa-vpn-network-tunnels description 'Remote IPSec tunnels'
set firewall group network-group cisco-asa-vpn-network-tunnels network 10.16.71.0/24
set firewall group network-group cisco-asa-vpn-network-tunnels network 10.16.74.0/24
set firewall group network-group cisco-asa-vpn-network-tunnels network 10.16.75.0/24
set firewall group network-group cisco-asa-vpn-network-tunnels network 10.16.191.0/24
set firewall group network-group cisco-asa-vpn-network-tunnels network 10.16.73.0/24
Define the agreed local subnet:
set firewall group network-group vpn-cisco-asa-local-routable-ip-net description 'Routable IPs from local subnet to Cisco-ASA B2B IPSec VPN'
set firewall group network-group vpn-cisco-asa-local-routable-ip-net network 10.0.0.0/24
In addition, define the network of the OpenVPN users:
set firewall group network-group openvpn-users description 'OpenVPN users network'
set firewall group network-group openvpn-users network 192.168.179.0/28
Set-up the firewall
Now we need to allow IPSec connections to our router. I assume you have the default firewall set-up, so a WAN_IN and WAN_LOCAL zone.
set firewall name WAN_IN rule 33 action accept
set firewall name WAN_IN rule 33 description 'Allow ipsec encrypted traffic'
set firewall name WAN_IN rule 33 ipsec match-ipsec
set firewall name WAN_IN rule 33 log disable
set firewall name WAN_IN rule 33 source group network-group cisco-asa-vpn-network-tunnels
set firewall name WAN_IN rule 100 action drop
set firewall name WAN_IN rule 100 state invalid enable
Note the “drop” rule is the last rule in the ruleset. Commit the current changes before we proceed further.
commit
save
Set-up the VPN connection
First we need to define the parameters for the Internet Key Exchange and ESP payload:
set vpn ipsec esp-group Cisco-ASA compression disable
set vpn ipsec esp-group Cisco-ASA lifetime 3600
set vpn ipsec esp-group Cisco-ASA mode tunnel
set vpn ipsec esp-group Cisco-ASA proposal 1 encryption aes256
set vpn ipsec esp-group Cisco-ASA proposal 1 hash sha1
set vpn ipsec ike-group Cisco-ASA lifetime 86400
set vpn ipsec ike-group Cisco-ASA mode main
set vpn ipsec ike-group Cisco-ASA proposal 1 encryption aes256
set vpn ipsec ike-group Cisco-ASA proposal 1 hash sha1
commit
save
Note the parameters above need to be exactly the same as agreed upon with the external party.
Also disable auto-firewall as we want to manage this ourselves:
set vpn ipsec auto-firewall-nat-exclude disable
Now, define the site-to-site connection. First we set-up authentication. We set-up our public IP address as ID, otherwise the connection would be initiated with our eth1 address, which is still internal.
set vpn ipsec site-to-site peer 88.88.88.88 authentication id 99.99.99.99
set vpn ipsec site-to-site peer 88.88.88.88 authentication mode pre-shared-secret
set vpn ipsec site-to-site peer 88.88.88.88 authentication pre-shared-secret 'ABCDEF123'
Assign the ESP and IKE group:
set vpn ipsec site-to-site peer 88.88.88.88 connection-type initiate
set vpn ipsec site-to-site peer 88.88.88.88 default-esp-group Cisco-ASA
set vpn ipsec site-to-site peer 88.88.88.88 description 'Cisco-ASA B2B VPN (IPSec - Cisco)'
set vpn ipsec site-to-site peer 88.88.88.88 ike-group Cisco-ASA
Make it clear which interface should be used for setting up the VPN. In this case we use eth1 which is our WAN interface connected to the ISP modem:
set vpn ipsec site-to-site peer 88.88.88.88 local-address 192.15.1.10
If you were to set the public IP address, the VPN implementation of Strongswan wouldn’t be able to identify the interface needed to set-up the IPSec connection.
Define all the tunnels, for each local/remote subnet combination you define one tunnel:
set vpn ipsec site-to-site peer 88.88.88.88 tunnel 0 local prefix 10.1.65.0/24
set vpn ipsec site-to-site peer 88.88.88.88 tunnel 0 remote prefix 10.16.71.0/24
set vpn ipsec site-to-site peer 88.88.88.88 tunnel 1 local prefix 10.1.65.0/24
set vpn ipsec site-to-site peer 88.88.88.88 tunnel 1 remote prefix 10.16.74.0/24
set vpn ipsec site-to-site peer 88.88.88.88 tunnel 2 local prefix 10.1.65.0/24
set vpn ipsec site-to-site peer 88.88.88.88 tunnel 2 remote prefix 10.16.75.0/24
set vpn ipsec site-to-site peer 88.88.88.88 tunnel 3 local prefix 10.1.65.0/24
set vpn ipsec site-to-site peer 88.88.88.88 tunnel 3 remote prefix 10.16.191.0/24
This can become very cumbersome if you have a lot of local and remote subnets. An alternative is to use a virtual tunneling interface (vti). This creates a routable subnet to redirect traffic through, however, both parties must support and use a vti or you would get INVAL_ID hash errors.
Set-up the external gateway
It depends on your ISP modem or external gateway how you should set this up exactly. You should configure:
- IPSec pass-through or forward protocol number 50
- Port forward UDP port 500 and 4500.
Set-up NAT
A classic IPSec tunnel is a weird beast. It does not use a dedicated interface like OpenVPN with its own NAT rules. Instead your WAN port is used for external traffic. You have probably set-up your WAN port to masquerade external traffic:
set service nat rule 5100 description 'WAN outbound traffic'
set service nat rule 5100 outbound-interface eth1
set service nat rule 5100 type masquerade
If we would not define an additional NAT rule, this NAT rule would also apply for our IPSec traffic. This means the traffic to our external subnets would get masqueraded and Strongswan would not kick-in and encrypt our traffic. Instead, the traffic would get masquerades and send to the ISP modem which wouldn’t know what to do with it.
set service nat rule 5002 description 'Exclude IPSec packets from masquerade NAT'
set service nat rule 5002 destination group network-group cisco-asa-vpn-network-tunnels
set service nat rule 5002 exclude
set service nat rule 5002 outbound-interface eth1
set service nat rule 5002 protocol all
set service nat rule 5002 source group network-group vpn-cisco-asa-local-routable-ip-net
set service nat rule 5002 type masquerade
Note the rule number (5002) is lower than the masquerading rule (5100). With the exclude directive we exclude the rule from being NATted further.
Enable OpenVPN users to access the IPSec tunnel
By default, OpenVPN users would not be able to access the remote subnets because their traffic originates from the 192.168.179.0/28 subnet. We need to masquerade, so it looks like they come from the 10.0.0.0/24 subnet. We can add a NAT rule for that.
set service nat rule 5000 destination group network-group cisco-asa-vpn-network-tunnels
set service nat rule 5000 outbound-interface eth1
set service nat rule 5000 outside-address address 10.0.0.1
set service nat rule 5000 protocol all
set service nat rule 5000 source group network-group openvpn-users
set service nat rule 5000 type source
We sacrifice local IP address 10.0.0.1 to act on behalf of the VPN users. VPN users will be seen on the remote network as 10.0.0.1.
Complete the configuration and exit configuration mode:
commit
save
exit
Testing the VPN connection
If you run the VPN diagnostic commands you get no output:
show vpn ipsec sa
This happens because the VPN tunnel is lazily initialized. If no traffic is generated to the remote subnets the tunnel is not initialized. Try pinging to a host at the other side from a host in your local LAN or use the following command:
/bin/ping -I 10.0.0.4 10.16.71.7
We instruct the OS to ping from the LAN interface (br0) to 10.16.71.7. The ping will originate from the LAN IP 10.0.0.4 which will be routed through the tunnel.
If the ping is successful you should see that the VPN tunnel is now online:
show vpn ipsec sa
Troubleshooting
IPSec is very strict and easy to get wrong. You may not get the VPN tunnel online. In this case open a second terminal and show the log:
sudo swanctl --log
In your first terminate restart the IPSec daemon and ping the remote host:
restart vpn ipsec
/bin/ping -I 10.0.0.4 10.16.71.7
In your second terminal you should see diagnostic messages. This should help you resolve the issue.
Wrapping up
In this guide you have read how you can set-up an IPSec connection from EdgeOS to a Cisco ASA appliance, with the Edgerouter being NATted. I had spent quite a lot of time setting this up, due to missing examples online so I hope this is useful to someone!
What are your thoughts?